Adding an email Trigger for a form
Adding an email Trigger for a form
A Trigger is a pre-set action that you wish to happen once a form is submitted in to the system.
Please see the Glossary terms for Standard Trigger and Conditional Trigger for more information on their purpose and scope.
To add an email Trigger for a form :
- From 'Forms - home' main menu option click 'Manage' on the right form in the list.
- then click 'Share' from the options across the top menu.
- click the green '+ Add new Trigger' button to get started.
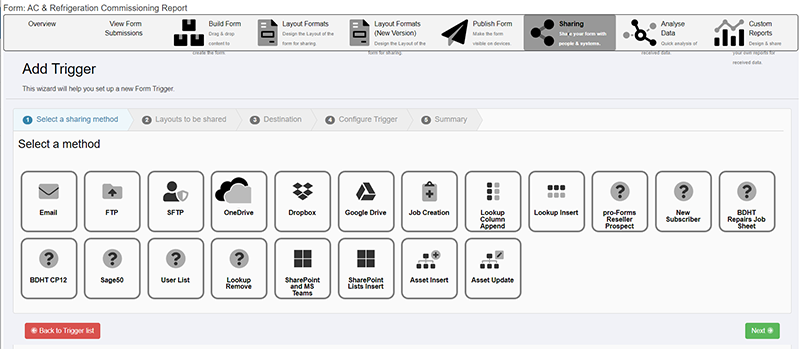
- You will be presented with the first of the 5 steps of the Trigger Wizard process 1. Select a Sharing method (see image below).
- Select 'Email' as the method. You will be taken to step '2. Select a Layout'
- A list of Layouts created for the form will be shown. Select the one you wish to be attached to the email Trigger to be sent out from the system.
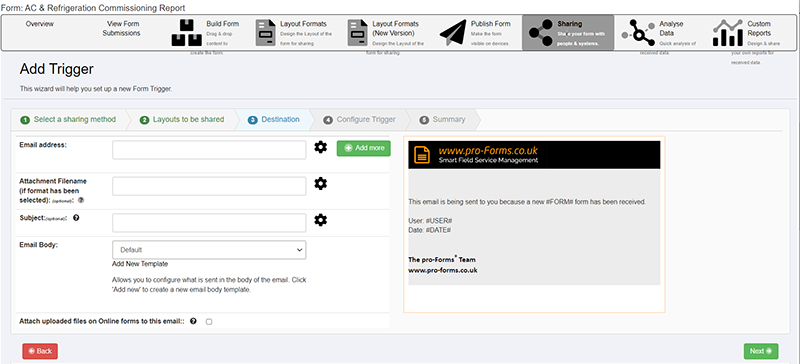
- You will be automatically taken to step '3. Destination' (see below).
- In the left hand set of boxes you can enter the information and email addresses required for the outbound email Trigger. Use the green '+ Add more' button to add a second and subsequent email address, please do not add more than 1 email address in any of the email boxes. This will stop your Trigger from running.
- Clicking the configure icon at the right of any of the email fields will display a list of fields on the form that can be clicked and added to the outbound email e.g. Subject line could include form fields for company name and machine serial number.
- If you want to add a file name for the Layout being attached to the email trigger please add a file extension at the end of the name e.g. if a PDF Layout is attached then the file name could be : airconreport.pdf
- we recommend that an email body Layout is created from the Layout Formats option for the form. There is a template option that can be clicked to generate the Layout for you. When saving the email body Layout give the layout an obvious name such as 'name of form - email body'. After saving the email body layout it will become available in the dropdown list against the Email Body option when setting up the trigger.
- the newly selected Email Body layout will be displayed on the right hand half of the screen.
- click the next button to move to step '4. Configure Trigger'.
- enter a description for the trigger being setup - this is to help system users know what the purpose of each trigger is when displayed in the trigger list for a form.
- use the radio buttons to set whether the trigger is to be Standard or Conditional trigger - see Glossary for more information.
- set the slider to turn on or off the automatic sending out of the trigger from the system. If set to off, then a user with a Web User account type will need to run the trigger manually from the 'Forms - View Submissions' option for each form submitted.
- click the green 'Next' button. Step '5. Summary' will be displayed. This is a summary of each the trigger parameters set at each step of the wizard. Click the green 'Create Trigger' button when finished.
Step 1 - Select a Sharing method
Step 3 - Destination